Intro
Python is a great choice for building REST APIs because it has a vast ecosystem and mature frameworks. Using Python also provides the benefit of being able to develop rapidly. There are several popular frameworks for developing APIs in Python, but in this post I'm going to show how to use Django and the Django REST Framework. Django is a well-known web framework which follows the model view controller (MVC) pattern. It comes with many features such as object-relational mapping, routing, authentication and authorization. Using Django, you can develop MVC applications with HTML rendered on the server. If we want to develop a REST API and have the HTTP requests provide JSON, Django REST Framework can be used on top of Django. The Django REST Framework allows you to follow much of the same MVC patterns that are implemented in Django, but it provides functionality specific to REST APIs such as converting models to JSON.
For this tutorial, I'm going to show how to develop a simple API for storing and retrieving information about a garden. Note that I am working on a Linux machine. The commands I use are the same for both Linux and Mac, but some may be different for Windows.
All of the code for this tutorial can be found in GitHub: https://github.com/MarkyMan4/garden-api
Development environment
To follow this tutorial, you will need the following installed on your computer:
- Python 3.x
- A text editor - I'm using VS Code
- SQLite
- SQLite Studio - a GUI for working with your SQLite database
- Postman - for testing the API end points
The first step is to set up your project folder. Create a folder where you want to create the project and go into that folder.
$ mkdir garden-api-tutorial$ cd garden-api-tutorial
Next, create a Python virtual environment. Virtual environments are good practice because it helps organize project dependencies. When installing Python packages, they are installed globally by default, meaning that any Python program on your computer has access to them. For different projects, there may be different packages used or different versions of the same packages, so keeping them separate helps stay organized.
# create a virtual environment called "venv"$ python -m venv venv# activate the virtual environment$ . venv/bin/activate
Once the virtual environment is activated, installing packages will install them only in this environment. The
virtual environment can be deactivated with the command deactivate.
Now Django and Django REST Framework can be installed with the following commands:
$ pip install django$ pip install djangorestframework
After installing this, the Django commands can be used. To start a project, issue the following command. This will create a new folder named garden_api with the basic files and scripts used by Django. Go into this folder and open it in your text editor.
$ django-admin startproject garden_api$ cd garden_api$ code . # opens folder in VS Code
To verify everything is set up correctly, run the following command in the garden_api folder.
$ python manage.py runserver
Then go to http://127.0.0.1:8000/ in your browser. You should see this.
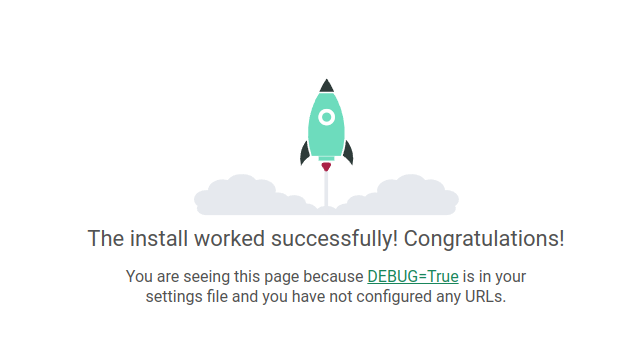
To finish the setup, press CTRL+C in the terminal to stop the web server. Then run the following commands.
$ python manage.py migrate
Running this will create a SQLite database file called db.sqlite3 (This is Django's default database, this can be changed at any time). Migrating is simply setting up the database schema. There are some tables that Django needs in the database, so running this initial migrate just creates those tables. I will go more in depth about how migrations work later on in this post.
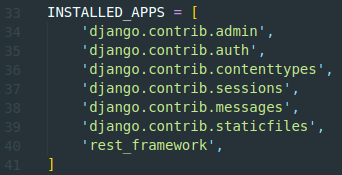
To allow this Django application to use the Django REST Framework, it needs to be added to Django's list of
installed apps. In garden_api/settings.py, find the INSTALLED_APPS list and add a
record for 'rest_framework'.
Setting up the database
We now have a basic Django project and can start writing code. The first step in creating the API will be to set up the database. First, a Django "app" needs to be created. Apps within a Django project provide a way to organize functionality. For example, there could be an app for handling authentication and another app to handle retrieving/storing data about the garden. For now, I will just create a "garden" app. This can be done with the following command.
$ python manage.py startapp garden
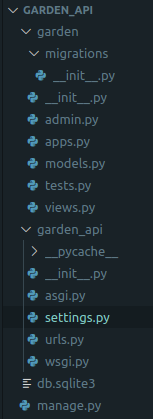
At this point, the folder structure should look like this:
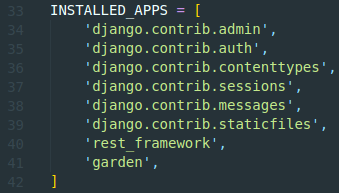
Whenever an app is created, you need to add it to garden_api/settings.py.
To create and modify tables, Django's built-in migration tool can be used. This allows the developer to define models (classes representing database tables or views) and Django handles creating the tables based on those models. If the models change, Django will detect those changes and apply them to the database. Another advantage of using Django's migration tool is that it keeps track of migration history, so you can always revert your table structure to a previous point in time. Also, if you switch to a different database, you can just run migrations to set up the new database the exact same way.
The first model will be garden. This will be a simple model with two fields name and
square_feet. In garden/models.py. Add the following code.

In the terminal, run the following commands.
$ python manage.py makemigrations$ python manage.py migrate
You should see the following output:

Two things will happen here.
-
Running
makemigrationswill generate a migration script. This is what Django will run to apply the changes to the database. You can see the migration script ingarden/migrations -
Running
migratewill run the migration script that was generated in the previous step.
In SQLite studio, connect to the database to verify that tables were created properly. Click on the database logo with the green plus.

Then click the folder icon and find the db.sqlite3 file in the project folder. Name the database whatever
you want. Then test connection and click OK.
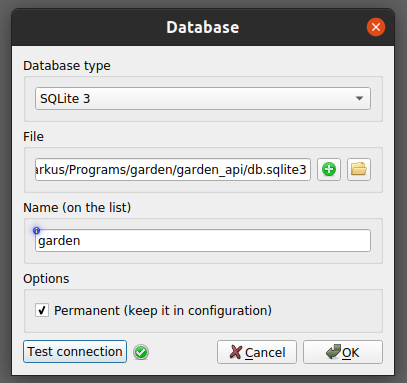
In the databse explorer pane on the left side, the garden database will show up. Right click on the database and click
"Connect to database". There are several tables in the database that are created by default by Django. There should also
be a table called garden_garden.
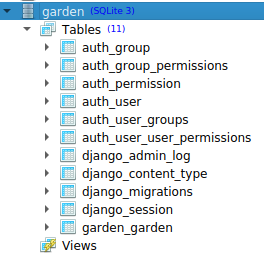
This is the table that was created based on the garden model.
Django names the tables <app name>_<model name>. Double click on the garden table to see the
table definition.

Notice that an id field was added even though it wasn't defined in the model. Django automatically
adds this column as a primary key for every model.
Here are the rest of the models needed for this API. These should once again be added to
garden/models.py.
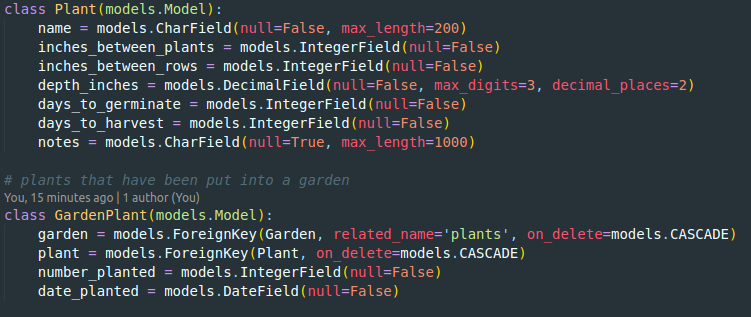
The fields in these models have null=False. This is to specify that the fields cannot be null in the database.
In the GardenPlant model, there are foreign key fields. I will show how these are used by the ORM later. Defining
these fields means that Django will perform joins behind the scenes without manually writing the SQL to join the tables. In
foreign key fields, the on_delete=models.CASCADE argument tells Django that if the foreign key record is deleted,
the corresponding GardenPlant record should be deleted as well. This way, we don't have to worry about foreign
key constraints being violated when deleting records. It will be hanlded behind the scenes.
Rerun the following commands to create the tables in the database.
$ python manage.py makemigrations$ python manage.py migrate
The final step in setting up the database is to add some data. We will add data for the garden_plant table.
For the other tables, we will add data once we set up the API end points to do so.
Run the following insert statement in SQLite studio. This can also be found in the repo

Verify the data was inserted by selecting from the table.

Developing API end points
I'll show how to set up a basic API end point to retrieve all the information in the plants table, then I'll create the rest of the end points following a similar pattern.
The first thing to do is create a serializer for the Plant model. A serializer tells Django REST Framework
how to convert Plant objects into JSON, as well as how to load JSON into instances of Plant objects. Create
a file called serializers.py inside the garden folder. For this tutorial, I'll put all of
the serializers in this file.
In this file, add the following code. Django REST Framework implements serializers, so we are essentially just configuring the serializers to tell the framework which models to use and which fields to include. The list of fields tells which fields will be included in the JSON that is generated.
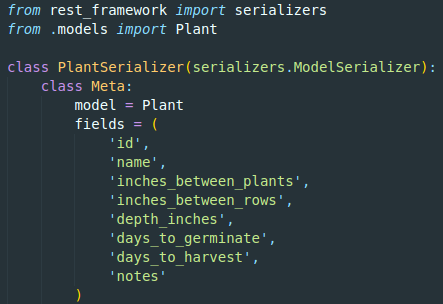
The next step is the set up the view set. A view set is a collection of methods that interact with some model.
For example, if we had a url pattern api/plants, we could map it to a view set. The view set can then
handle what actions to take based on the HTTP method used (GET, POST, DELETE, etc.). For an end point that lists
all the plants in the database, the below view set can be used. This code should go in garden/views.py.
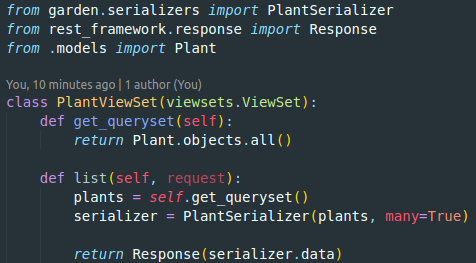
The get_queryset method queries the garden_plant table. This is making use of the ORM,
so we don't directly write SQL queries in the code. Plant.objects.all() is equivelant to
select * from garden_plant. The ORM is very versatile and can do much more complex queries (see the docs
here).
The next method is list. By naming this method list, we are implementing the list
method that we get by extending viewsets.ViewSet. This means that when a GET request is sent to the base URL
that we map to this view set, this method will be called. Some other methods that can be implemented are:
- list (GET <base URL>)
- retrieve (GET <base URL>/<id>)
- create (POST <base URL>)
- update (PUT <base URL>/<id>)
- destroy (DELETE <base URL>/<id>)
You can also define additional end points using the same base url with the @action decorator. You can
see how to use that here.
Inside this method, get_queryset() is called to get the data we want to serialize. It is then passed
to a PlantSerializer with the argument many=True to tell it that this will be a list of
Plant objects. Finally, a response is returned containing serializer.data. The serializer.data
gives us a list of dictionaries representation of the query result. Putting that in the response will convert it to the actual
JSON that is received by the caller of this end point.
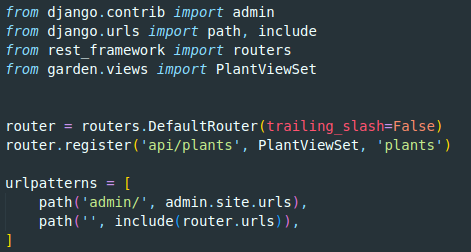
The last step is to configure a URL that maps to the view set. Adding the below code to garden_api/urls.py
will achieve this. Most of this code is just part of the initial set up of the urls.py file. Whenever a new route
needs to be added, it will look like router.register('<URL prefix>', <view set name>, '<base name>').
The base name should just be something descriptive. Only the URL prefix determines the mapping to our view set.
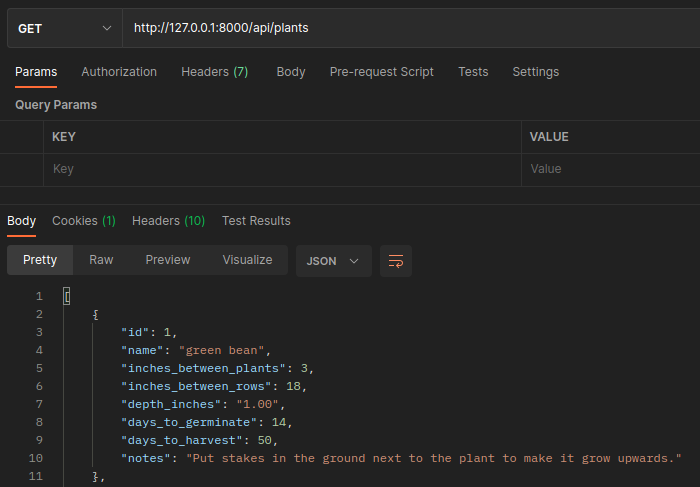
Now we should be able to invoke the end point to list the plants. In the terminal, run:
$ python manage.py runserver
Then open Postman, and send a GET request to http://127.0.0.1:8000/api/plants. You should see a response
with all the plants from the garden_plant table.
Now that these pieces are in place, I'll show how to add another end point to the PlantViewSet.
Since an end point is being added to this existing viewset, it will have the same url prefix - api/plants.
I'll add a retrieve method which can be accessed with this url: api/plants/<plant ID>. To
create this end point, all that needs to be done is writing the retrieve method like this.
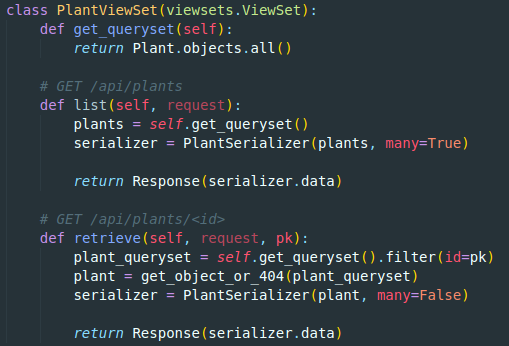
The difference between this and the list method is that now we are filtering the queryset.
Using the filter method, we can filter on any field in the Plant model.
Also, the get_object_or_404 method is used. This is used to ensure the code doesn't error out
if the ID provided does not match anything in the database. Instead, it will just give a 404 response. I didn't
include it in the screenshot, but you can import the method like this from django.shortcuts import get_object_or_404.
Also notice that the serializer is now given many=False as an argument since we are only serializing one object.
You can test this in Postman by sending the same request as before, but put /1 at the end of the URL.
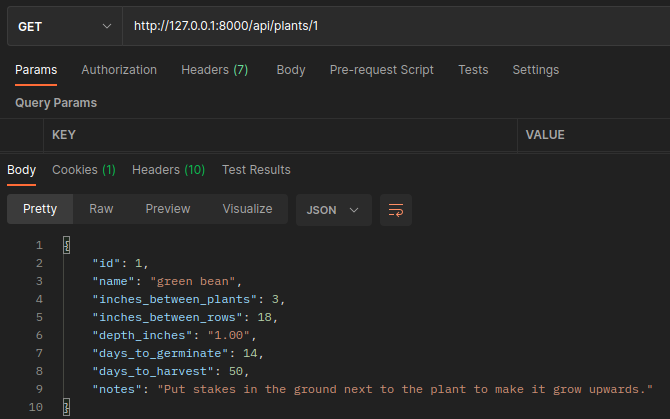
You'll also notice that if you put an ID that doesn't exist in the database, it will give this response.
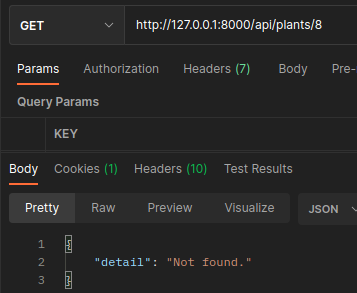
That covers the basics of how to make a couple simple end points. Now I'll show how to build the rest of the end points. It will be the same workflow (create a serializer, create a view set, map a URL to a view set). The focus will just be on the code that runs whenever each end point is called. This is the nice thing about Django. Not much time needs to be spent on configuration. Most of the development effort is spent actually writing the core logic of the application.
We will build end points that do the following:
- Create a new garden
- List all the gardens (and all plants in that garden)
- Retrieve a specific garden
- Create a new garden plant
A serializer needs to be created for each model. This will be done in the same serializers.py
file that was used for PlantSerializer. The serializers just need to use the corresponding model and fields.
Add the following classes to garden/serializers.py. Be sure to import the Garden and Plant
models as well.
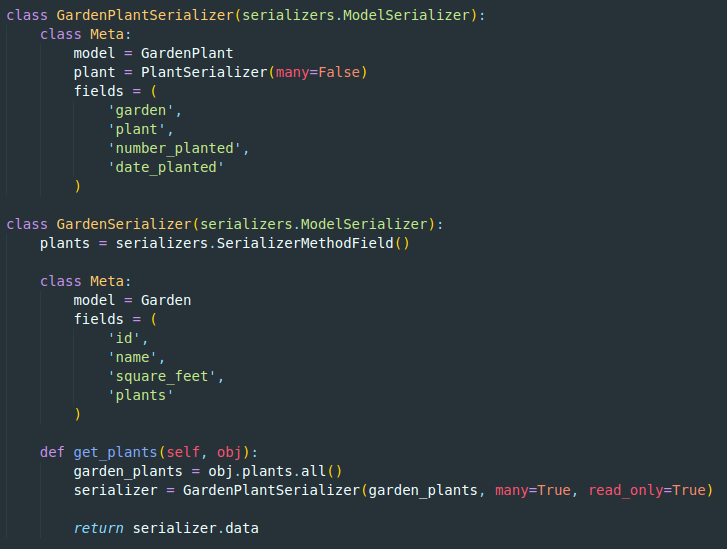
Notice that GardenPlantSerializer includes plant as an attribute in the Meta class.
Normally, serializing a foreign key field would just give us the foreign key (i.e. the ID of the record from the other table).
By adding their serializers as attributes, this tells the GardenPlantSerializer to serialize those models as well.
The GardenSerializer includes a plants attribute. This is
slightly different because the foreign key is reversed in this case. GardenPlant has a foreign key referencing Garden.
By adding this, each serialized Garden will also include a list of all the GardenPlants nested in the JSON. The
get_plants method is used to retrieve the GardenPlant data that we want to serialize when retrieving a
Garden. This method is simply getting all the GardenPlant objects that reference the current
Garden that is being serialized.
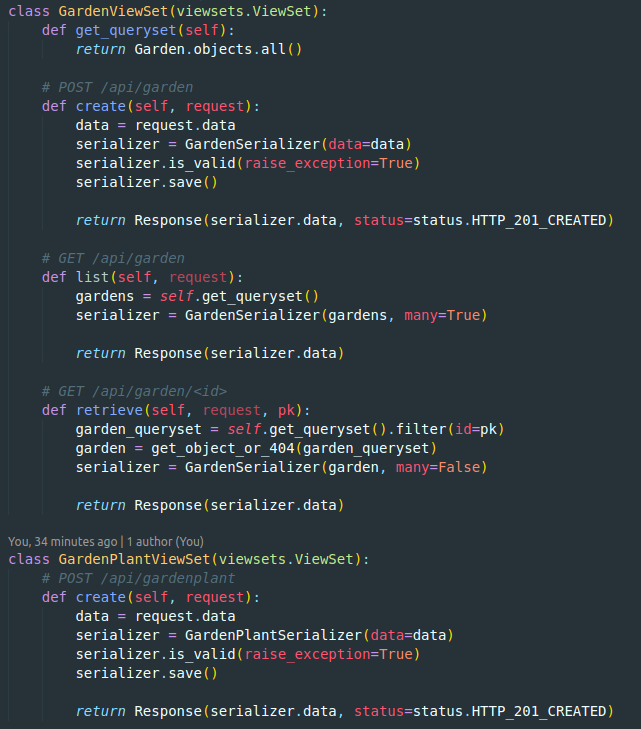
Now the view sets can be written for the end points. These view sets that just do simple CRUD (create, read, update, delete)
operations all look more or less the same. The list and retrieve methods look more or less the same
as what we did for PlantViewSet. The only difference is the models/serializers being used. You will also notice a
couple create methods. These show how the ORM is used to create a new record in the database. The serializer is used to load
the JSON into a model, then the model is saved to the database.
Finally, the URLs just need to be added.

Testing the API
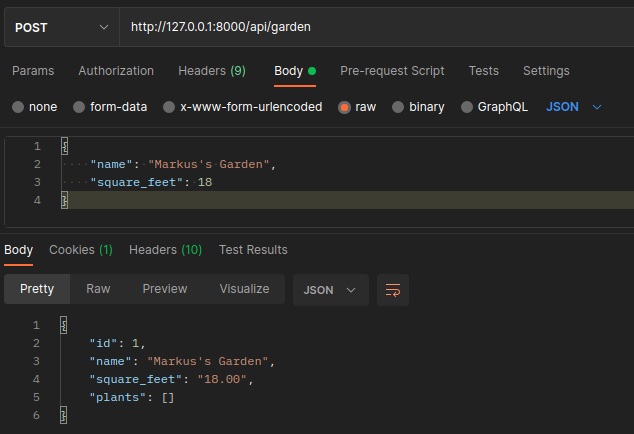
The last thing I will show in this tutorial is how to use the end points we developed. The first thing we'll do is create a new garden. To do this, we need to include the garden information in the body of the request.
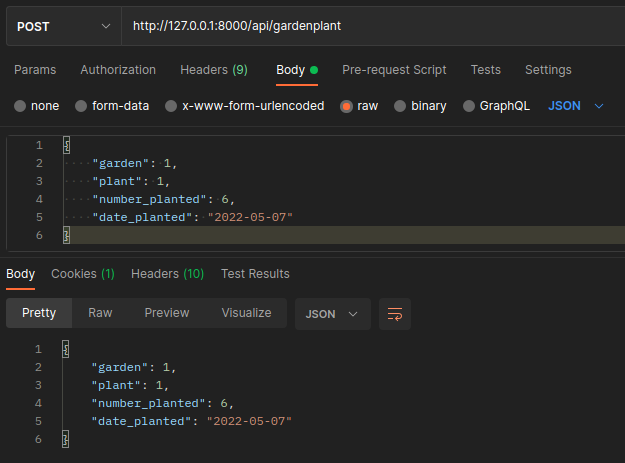
Use the below request to create a garden plant. You can send a couple requests where you change
plant to some other plant ID from the database.
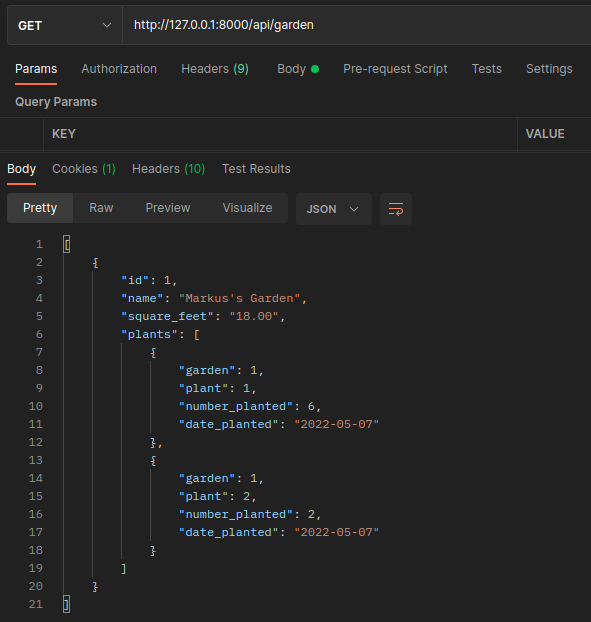
After creating everything. You can use the following request to list gardens.
You can also add /<id> to retrieve just one garden.
Conclusion
This tutorial showed how to create an API that can perform some simple CRUD operations on a database.
As far as where to go from here, I would recommend becoming familiar with all the functionality that the
Django ORM has to offer. You can also look into creating custom end points (outside of list,
retrieve, etc.). You may also want to try using query parameters to allow for
some more custom filtering of the data. This is easy to implement and you can find more information
about it here.
Additionally, you could work on implementing authentication/authorization. With APIs, users typically send a username/password to authenticate and they receive a temporary token. With each subsequent request, they include that token in the header. For this garden example, you could make it so that users can only retrieve data about gardens that they have created. You can read more about authentication here. I would recommend using either JWT or Knox for authentication. I also have a GitHub repository with a template project using Django REST Knox for authentication. You can find it here. I often use this template as a starter for my other Django projects that require authentication. The template project also includes a React front end with forms to register and login.