Intro
In this article, I will show how to build a CLI application using Python. The focus of this article is more on the packaging and distribution of the application. For this example, I will build a simple application that retrieves facts from the Numbers API. Then I will show how to run the application, package it as a wheel file and distribute it.
Developing the app
Create a new directory for the project and create a virtual environment in that directory. For this project,
I will also need to install the requests package. I'll create the requirements.txt file
right away as well.
$ python -m venv venv$ . venv/bin/activate$ pip install requests$ pip freeze > requirements.txt
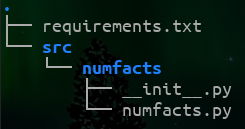
Now I'll set up the project structure. For developing packages, it is good practice to use a "source layout". More information about source layout vs flat layout can be found here.

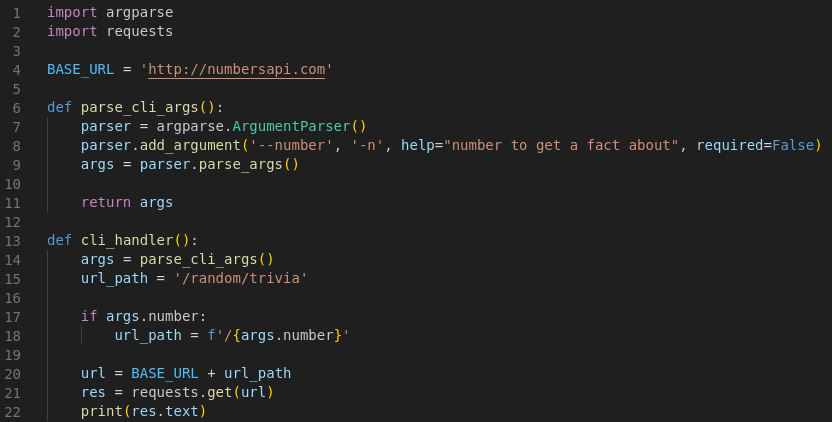
The numfacts.py file contains the application code. For now, I have it parsing the command line arguments and printing
out whatever the user entered just to verify things are working as expected. Since this is a very simple app, I have the completed
application code below. If no arguments are specified at the command line, a random piece of trivia is retrieved. Otherwise a number
can be specified and it will retrieve a fact about that number.

Packaging the app
Now I will show how to package this application as a wheel file. A couple more items are needed for this. For one, I like
to create a new virtual environment that contains the build tools. I'll keep these dependencies in a separate requirements file called
requirements-dev.txt.
$ python -m venv build-env$ . build-env/bin/activate$ pip install build$ pip freeze > requirements-dev.txt
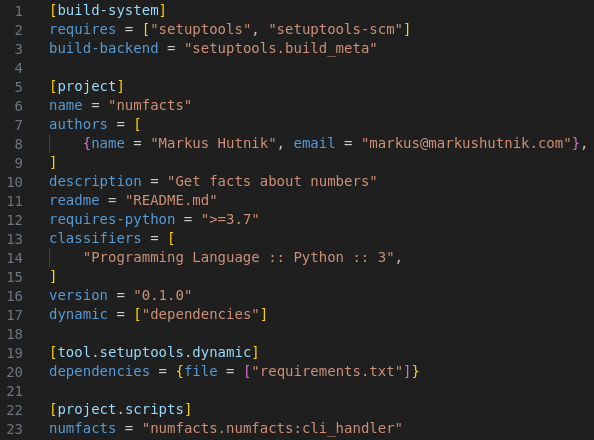
Next, create a file at the root of the project called pyproject.toml. This file contains metadata about the project and provides information
to the build tool. See the contents of this file below. This project is pretty vanilla, but notice the [project.scripts] section which points
to the function to invoke. Also [tool.setuptools.dynamic] tells the build tool that the requirements.txt file contains our
dependencies.

Now that we have the pyproject.toml file set up, we can install the package in "editable" mode. This is useful for development
because it will link the package to the location of the source code. This means that as changes are made to the source code, it won't be
necessary to reinstall the package to test it. I'm going to create one more virtual environment test-env for testing this.
$ python -m venv test-env$ . test-env/bin/activate$ pip install -e .
The CLI is now installed in this environment and can be run.

For the final step, we just need to build the package. Switch back to the build-env environment and run the following command.
This will create a dist directory that contains the wheel. The wheel can now be distributed and installed by others.
$ python -m build
As an extra note, this package can be published to PyPI as well. An easy way to do this is by using twine. In the build-env
environment, use the following commands to install twine and upload the package. Note that you will need to have a PyPI account and twine
will prompt you for your credentials.
$ pip install twine$ twine upload dist/*